¶ Cloud Snapshots
Cloud Snapshots capture everything.
Cloud Snapshots capture your entire system, including:
- Configuration settings
- VMs
- Tenants
- Networks
- NAS volumes
- Etc.
A Cloud Snapshot can be used to fully restore a VergeIO system.
Individual VMs and Tenants can also be recovered from a Cloud Snapshot.
Cloud Snapshots are set to run automatically using the installed Cloud Snapshots Snapshots Profile, which has the following schedule:
- Hourly Snapshots, on the hour, retained for 3 hours
- Daily Snapshots, at noon, retained for 1 day
- Daily Snapshots, at midnight, retained for 3 days
¶ Customize Your Cloud Snapshot Schedule/Retention
The schedule and retention rules for your Cloud Snapshots can be changed by either:
- Modifying the default Profile for Cloud Snapshots.
-or- - Assigning a different Profile for Cloud Snapshots.
¶ To Modify the Default Cloud Snapshot Profile:
The Cloud Snapshots default Snapshot Profile can be modified if needed. Refer to the Module 4.3 Snapshot Scheduling for instructions on modifying an existing Snapshot Profile.
¶ To Assign a Different Profile for Cloud Snapshots:
- From the Main Dashboard, click System on the left menu.
- Click Cloud Snapshots on the left menu.
- Click Select Snapshot Profile on the left menu.
- Select a Snapshot Profile from the dropdown list of all Profiles.
- Click Submit to save the change.
¶ To View a List of Cloud Snapshots:
- From the Main Dashboard, click System on the left menu.
- Click Cloud Snapshots on the left menu.
- A listing of existing Cloud Snapshots appears.
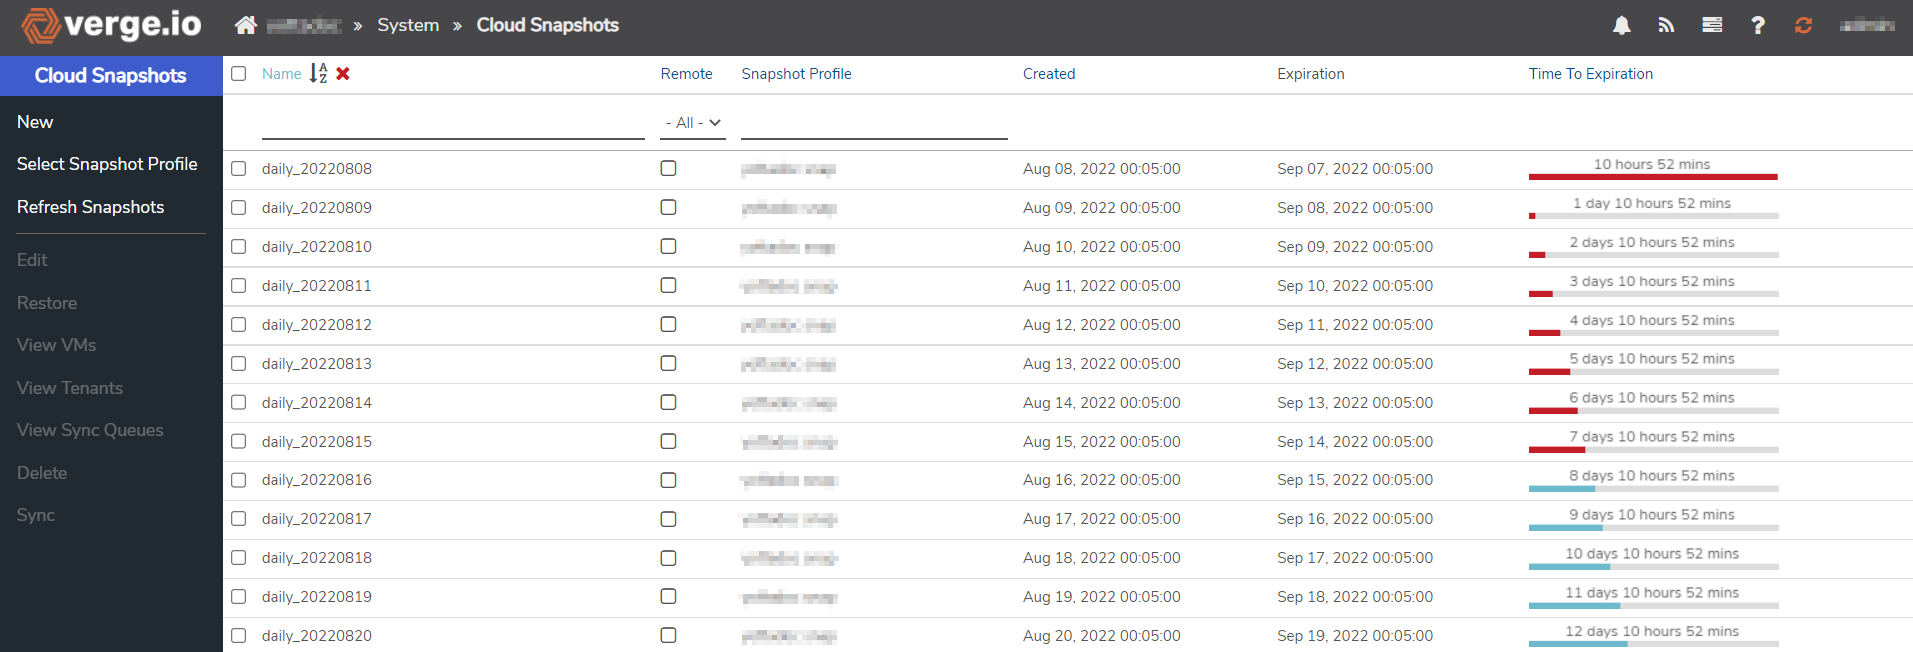
- Notice the following is displayed for each Snapshot:
- Name
- Profile used to create the Snapshot
- Date/Time Created
- Expiration
- Time to Expiration (Snapshots expiring soon display in red)
By default, Snapshots are listed in order by Time to Expire, with the closest to expiration
listed first.
¶ To Change a Cloud Snapshot Expiration:
Navigate to the Cloud Snapshots list (Main Dashboard -> System -> Cloud Snapshots).
Select the desired Snapshot in the list.
Click Edit on the left menu.
Change the Expires Date and Time as desired.
Click Submit to save the change.
In the Expiration Type field, the “Never Expire” option can be selected. This is typically not recommended, unless necessary. As source data diverges from the Snapshot data, there is less deduplication between the two and thus more vSAN usage.
¶ Manual Snapshots
Periodically, you may find the need to take a Cloud Snapshot manually, in addition to your automatic Cloud Snapshots. For example, right before a major hardware upgrade or facility electrical maintenance, etc.
¶ To Manually Take a Full Cloud Snapshot:
- From the Main Dashboard, click System on the left menu.
- Click Cloud Snapshots on the left menu.
- Click New on the left menu.
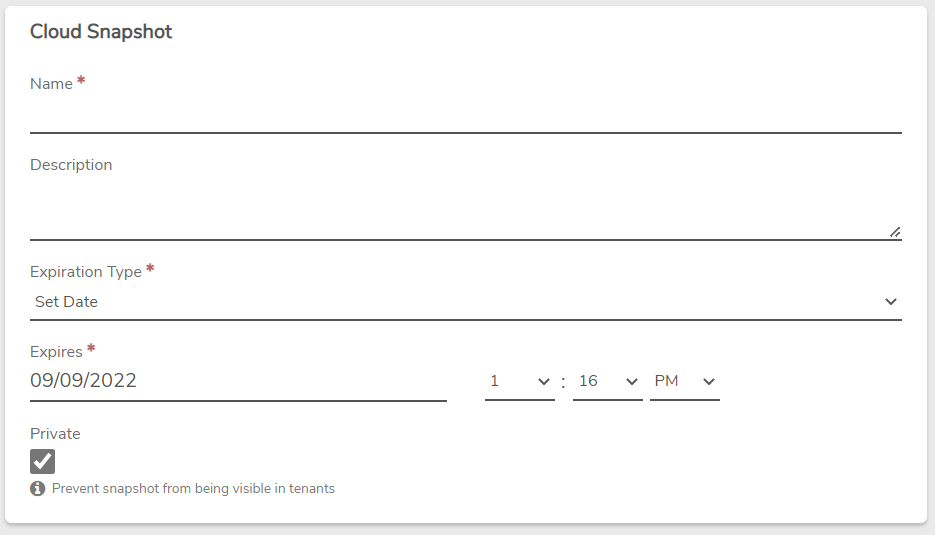
- Enter a Name for the Snapshot (required).
- Optionally, a Description can be entered to record further detail.
- The Expiration will default to 72 hours (3 days) from the current time. A different Expires date/time setting can be selected.
- Click Submit at the bottom of the page.
¶ Restoring with Cloud Snapshots
To Restore an Entire system with a Cloud Snapshot:
Restoring an Entire Cloud reverts everything within the Cloud, including all VMs, all Tenants, and all Cloud settings.
NOTE: Restoring an entire Cloud requires rebooting all Nodes. However, rebooting nodes can be done without system outages, provided there is enough RAM to handle VM migrations.
-
From the Main Dashboard, select System from the left menu.
-
Select Cloud Snapshots from the left menu.
-
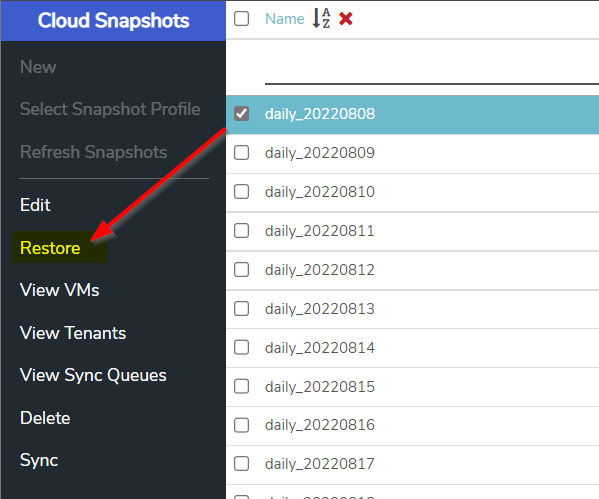
Click to select the desired Snapshot From the list.
-
Select Restore from the left menu.
A Warning message will appear to caution that this will overwrite the entire Cloud.
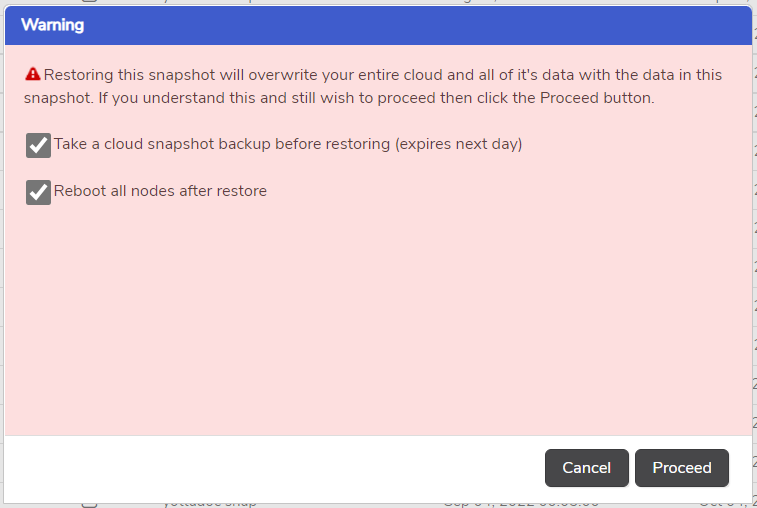
- By default, the option is selected to take a snapshot of the entire cloud before this restore. This allows for later reverting the cloud to the state right before the restore operation if needed.
- By default, the option to Reboot all nodes after the restore is enabled. This will let the system handle the node reboots. (Recommended)
- Click the Proceed button to continue / or Cancel to abort.
Another confirmation message will appear. To continue with the Cloud Restore, click the Proceed button or simply leave it alone as the restore operation will continue in 60 seconds unless canceled. To Cancel the operation, the Cancel button must be clicked within 60 seconds; otherwise, the restore operation will continue. - If you de-selected the option to automatically reboot all the nodes, you will need to manually reboot all nodes to put the Cloud restore into effect.
¶ To Import and Individual VM from a Cloud Snapshot (to make available for VM Restore):
-
From the VM Dashboard (Main Dashboard -> Machines -> Virtual Machines-> double click VM), select Cloud Snapshots from the left menu.
-
A listing of available Cloud Snapshots appears. Click to select desired Cloud Snapshot.
-
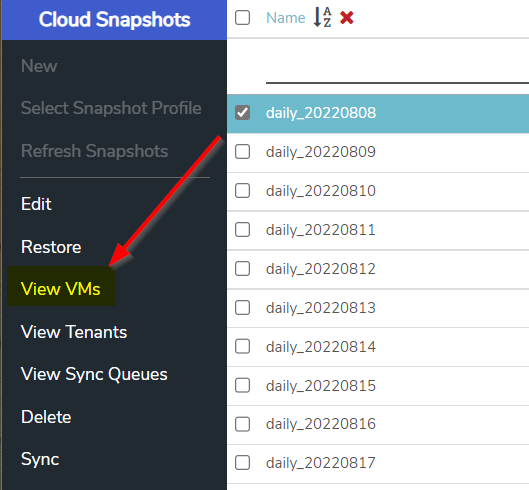
Select View VMs from the left menu.
-
Name, Description, and Expiration fields will default to the values from the Cloud Snapshot; if desired, change values for this import of the VM Snapshot. Changes made will only apply to the VM Snapshot import and will not affect the underlying Cloud Snapshot.
-
Click Submit to continue.
-
If the process was continued, a message will appear stating the import process has begun. Click the Ok button to acknowledge.
-
The Snapshot will appear in the list when it is imported.
TIP: Use the breadcrumb or browser back button twice to return the VM’s Dashboard to proceed with a VM Restore operation.
¶ Disaster Recovery
Using built-in Sync, you can synchronize your Cloud Snapshots to another VergeIO system to provide off-site backups, DR, and Business continuity. The Sync feature is covered within the Verge.io inline help system.
Need more Help? Email [email protected] or call us at (855) 855-8300