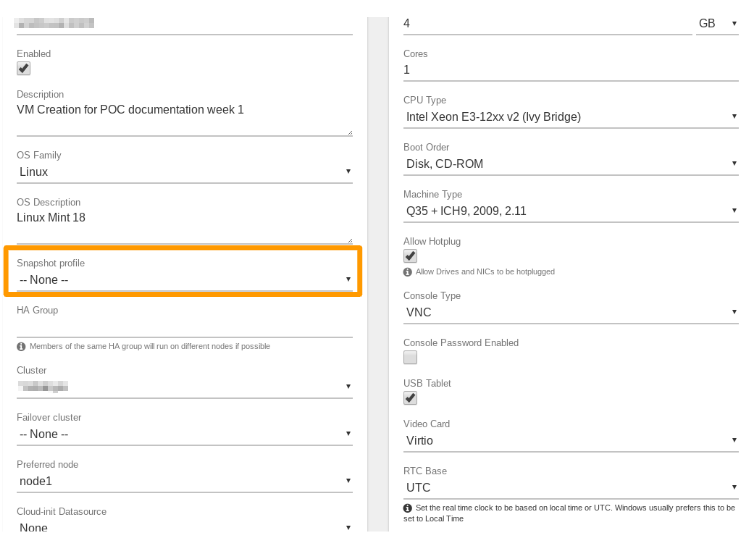
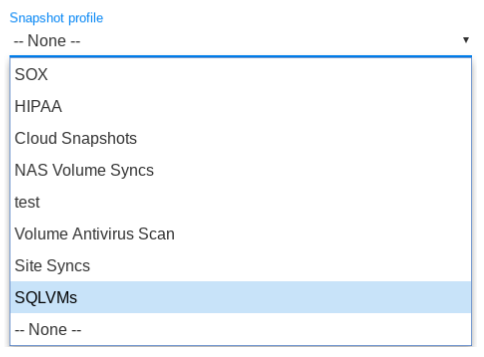
Typically, it is recommended to handle Snapshots of VMs through Cloud Snapshots, which automatically include a capture of all VMs. However, in circumstances where individual VMs need to be handled differently (Need for a snapshot at different times or different frequencies, or longer retention), a Snapshot Profile can be set for an individual VM. Additionally, manual Snapshots can be taken on an individual VM at any time.
¶ To Set a Snapshot Schedule (Snapshot Profile) for a VM:
- From the VM Dashboard (Main Dashboard -> Machines -> Virtual Machines -> double-click VM in the list) select Edit from the left menu.
- By default, all VMs have Snapshot Profile set to --None--

- In the Snapshot Profile field, select desired profile from the dropdown list.

- Click Submit at the bottom of the page.
¶ To Take a Manual Snapshot of a VM:
- Navigate to the VM Dashboard (Main Dashboard -> Machines ->Virtual Machines -> double click VM in the list).
- Click Take Snapshot on the left menu.
Note: the first field (Machine) is already populated with the selected VM.
- Enter a Name (required) for the Snapshot.
- Optionally, a Description can be added to record more detail.
- In the Expires field select a date and time for expiration.
- Click Submit at the bottom of the page.
NOTE: In the Expiration Type field, Never Expire can be selected. However, it is important to consider vSAN space utilization as the more that source data diverges from the Snapshot data, there is less deduplication between the two and thus more vSAN usage. It is typically not recommended to use the Never Expire option.
¶ Restoring A VM from Snapshot
NOTE: Individual VMs can be restored from a VM Snapshot or from a Cloud Snapshot (as a Cloud Snapshot includes all the VMs within the Cloud.) The VM Snapshot must first be imported from the Cloud Snapshot.
When Using a Snapshot to restore a VM, the original VM can be overwritten with the Snapshot or a new VM instance can be created.
¶ To Restore a VM from a Snapshot (OVERWRITE existing VM):
- The source VM must be powered off before you can restore over it. (Use proper guest OS and application shutdown procedures whenever possible.)
- Consider taking a temporary Snapshot of the VM right before restoring over it. This can allow taking the VM back to this point (before the restore), if necessary.
- Navigate to the VM Dashboard (Main Dashboard -> Machines ->Virtual Machines -> double click VM in the list).
- Click Snapshots from the left menu.
- Select desired VM Snapshot.
- Select Restore over Source from the left menu.
- A Warning message will appear to caution that this will overwrite the existing Virtual Machine. Click the Proceed button to continue/ or Cancel to abort.
- (If the process was continued,) a message will appear stating the Restore process has begun. Click the OK button to acknowledge the message.
¶ To Restore a VM from a Snapshot, create a new VM instance (leaving the existing VM as-is)
WARNING: When restoring to a new VM, care should be taken with consideration to running multiple versions of a VM. Conflicts or problems can arise such as same IP address, hostname, MAC Address, or multiple instances of guest applications).
- Navigate to the VM Dashboard (Main Dashboard -> Machines ->Virtual Machines -> double click VM in the list).
- Click Snapshots on the left menu.
- A listing of available Snapshots is displayed. Select the desired Snapshot.
- Click Restore To New on the left menu.
- The default Name of snapshot + " restored" can be changed, if desired.
- The Preserve MAC Addresses option will default to unselected, which means MAC Address(es) will be auto-generated by the system. The option can be enabled to keep the same MAC address(es) on the new VM. Caution should be used when selecting this option as to avoid duplicate MAC addresses within the same network.
- Click the Submit button to create the new VM from Snapshot.
The new VM will now appear in the Virtual Machines list.
Need more Help? Email [email protected] or call us at (855) 855-8300