¶ Snapshot Profiles - for Automating Snapshots
A Snapshot Profile automates the Snapshot process. A Snapshot Profile contains one or more Profile Periods that determine frequencies for taking Snapshots, naming convention, and the lifecycle policy (retention) for those Snapshots.
¶ To View Available Snapshot Profiles:
NOTE: The initial install includes multiple default Snapshot Profiles.
- From the Cloud Dashboard, click System from the left menu.
- Click Snapshot Profiles from the left menu.
- A listing of all defined Snapshot Profiles appears.

Double-click a Profile in the list to view its Dashboard, where more detailed information is available.
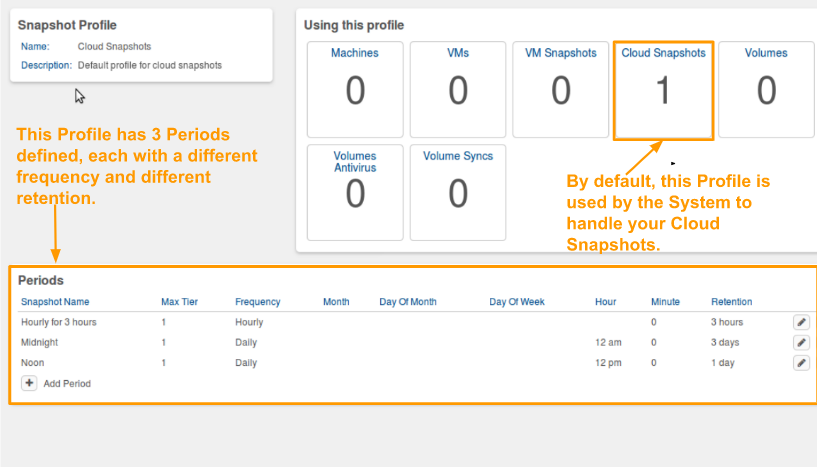
The following screenshot shows the Dashboard for the default Cloud Snapshots Profile (included with the initial installation).

¶ To Modify an Existing Snapshot Profile:
- From the Main Dashboard, click System from the left menu.
- Select Snapshot Profiles from the left menu.
- Double-click the desired Profile in the list.
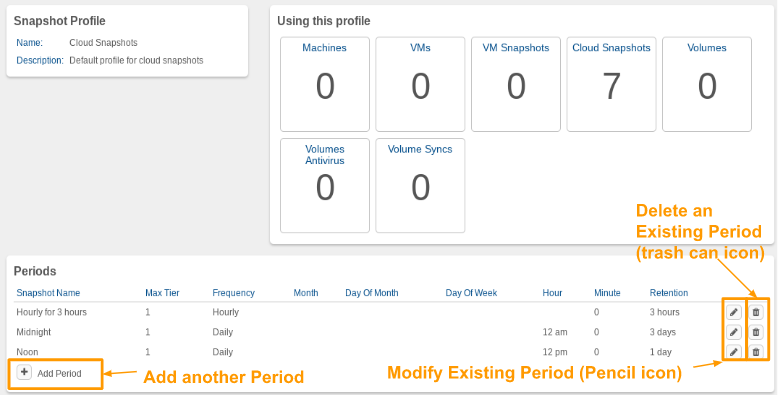
- The Dashboard for the selected Profile will appear. Add, modify or remove Periods to modify the existing schedule. To add another Period to the Profile: click the +Add Period link.
NOTE: a Snapshot Profile can contain multiple Periods. See detailed instructions below to add Periods to the Profile.
- To modify an existing Period from the Profile: Click the edit (pencil) icon to the far right.
- To remove existing Periods from the Profile: Click the delete (trash can icon)****. to the far right.

¶ To Create a New Snapshot Profile:
- From the Main Dashboard, select System from the left menu.
- Select Snapshot Profiles from the left menu.
- Select New from the left menu.
- Enter a Name (required) for the Profile. Consider using a name that is descriptive of the frequency / retention (e.g. houly3hrs-daily-4days) or descriptive of the elements to which it will be assigned (e.g. ProdServers)
- Optionally, a Description can be entered to record further information.
- Click Submit at the bottom of the page. The empty Snapshot Profile is created and its dashboard is displayed.
- At this point it is an empty Profile; Periods need to be added to add a schedule.
¶ Add Periods to the Profile:
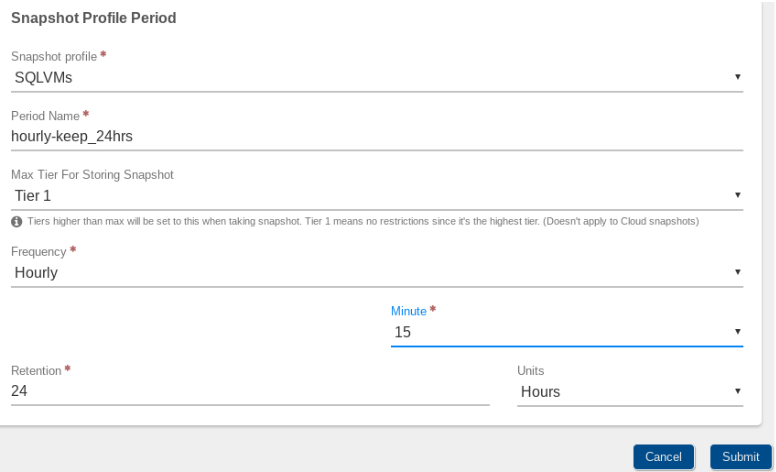
- Click the +Add Period link midway down the page. The Snapshot Profile Name appears in the first field.
- Enter a Period Name (required) (ex: weekly, 6 PM, Mondays, etc).

-
Select a Max Tier for Storing Snapshot (default = Tier 1, which is the most expensive Tier). Snapshot data will default to land on the same Tier as source data, except when the Max Tier is defined as a less expensive tier (less expensive = higher number). For example, if source data resides on Tier 2, but Max Tier has been set to Tier 3, the Snapshot data will be stored on Tier 3.
-
Select the Frequency for taking the Snapshots.
-
Select the values for (Month, Day of Month, Day of Week Hour, Minute) to schedule the Snapshots (fields will vary depending upon the Frequency selected) (Month, Day of Month, Day of Week Hour, Minute)
-
Select Retention Units:
- Days (default)
- Hours
- Years
- Forever (retained indefinitely)
-
Enter the Retention value (This does not apply when the "Forever" option is selected in Units)
-
Click Submit at the bottom of the page to add the Period to the Snapshot Profile.
-
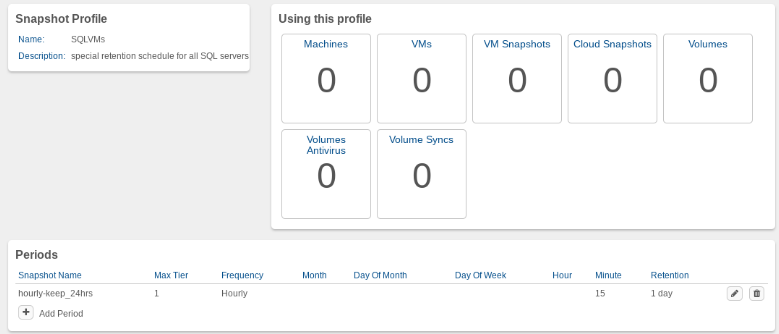
The new Period will appear on the Snapshot Profile Dashboard.

-
Click the + Add Period link and repeat the process to define additional Periods for the Profile if desired.
Once a Snapshot Profile is created and configured, it can be applied to use in the system. Subsequent modules discuss applying a Snapshot Profile to Cloud, VM, and NAS snapshots.
Need more Help? Email [email protected] or call us at (855) 855-8300