¶ Making Tenant Modifications
¶ Editing Base Configuration
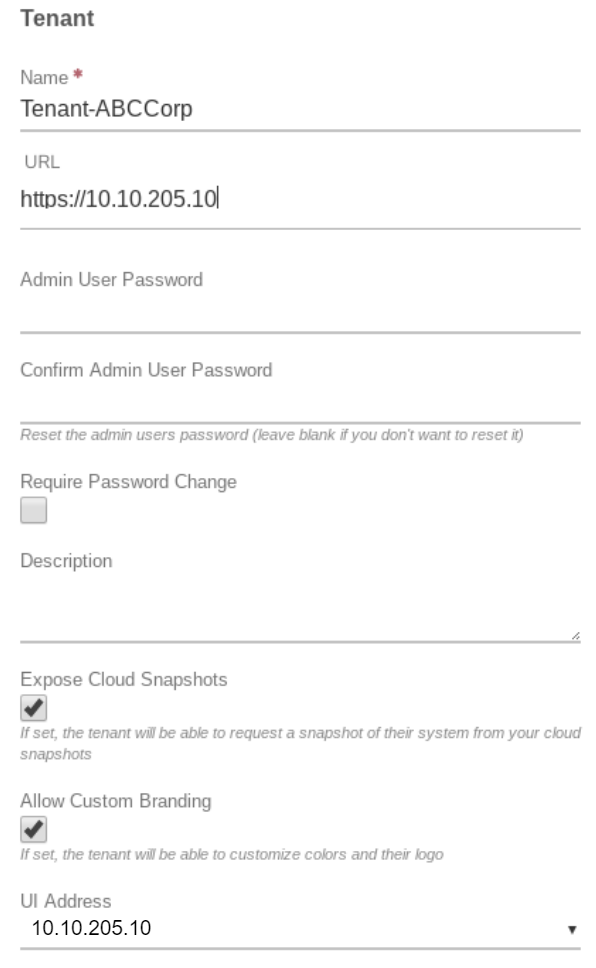
To edit any of the following properties of an existing tenant, navigate to the Tenant Dashboard page and click Edit on the left menu.
- URL Link
This is a helper field to provide a link for access to the Tenant UI login page from your own Dashboard. It is typically set to the same IP as the UI Address field (The address the Tenant uses to connect to their UI), however, it can be a different address for you (as the Service Provider) to access the Tenant UI. - Admin Password
This can be edited to perform a password reset for a Tenant Admin account. - Require Password Change
Typically it is recommended to enable this option to reset the password for the Tenant. - Description
- Expose Cloud Snapshots
This option can be enabled / disabled at any time. When enabled the Tenant will see the list ofyour available snapshots and can download to restore their own VergeIO Cloud / VMs within their Cloud. - Allow Custom Branding
When enabled, the Tenant can change colors / logos for their VergeIO UI.
NOTE: If this option is disabled after Tenant has already implemented custom branding, the branding changes will be lost.
- UI Address Address for the Tenant to access the VergeIO UI.
NOTE: This field is auto-populated with the first External IP assigned to the Tenant. If / When additional External IPs are assigned to a Tenant, the UI address can be changed to one of the other IP addresses. Rules will automatically be updated by the system; Apply Rules to both the associated External Network and Tenant Network if UI Address is modified.

¶ Giving Additional Resources to a Tenant
¶ Compute
Adding Cores/RAM
When increasing a Tenant’s compute resources, you will want to evaluate if the needed increase can be added to an existing Tenant Node or if you will need to scale out and add an additional Node. The Maximum resources that can be added to a single Node is determined by Cluster: Max RAM per machine and Cluster: Max cores per machine settings for the Cluster to which the Tenant Node is assigned.
¶ Tenant Node Planning
In general, it is best to max out the compute resources assigned to each Tenant Node and add additional Tenant Nodes each time additional capacity is needed. However, there may be situations where it will be better to balance resources between Tenant Nodes.
- Example:
A customer needs a total of 64GB RAM, and the max allowed on the cluster is 62GB. Rather than max out the first Tenant Node at 62GB and add a second Node at only 2GB, it would be better to equally balance between 2 Nodes - each with 32GB RAM, as it would not be practical to run a Node with only 2GB. For additional guidance in planning Tenant Node Resources, contact VergeIO Support.
¶ Adding resources to an existing Tenant Node:
NOTE: Cluster Max settings will determine the limit of Cores/RAM that can be added to a single Tenant Node. If these max settings will be exceeded, an additional Tenant Node should be created; see below for instructions on adding a Node.
- From the Tenant Dashboard, click Nodes on the left menu.
- The Node list appears. Double-click the desired Node.
- The Tenant Node Dashboard appears.
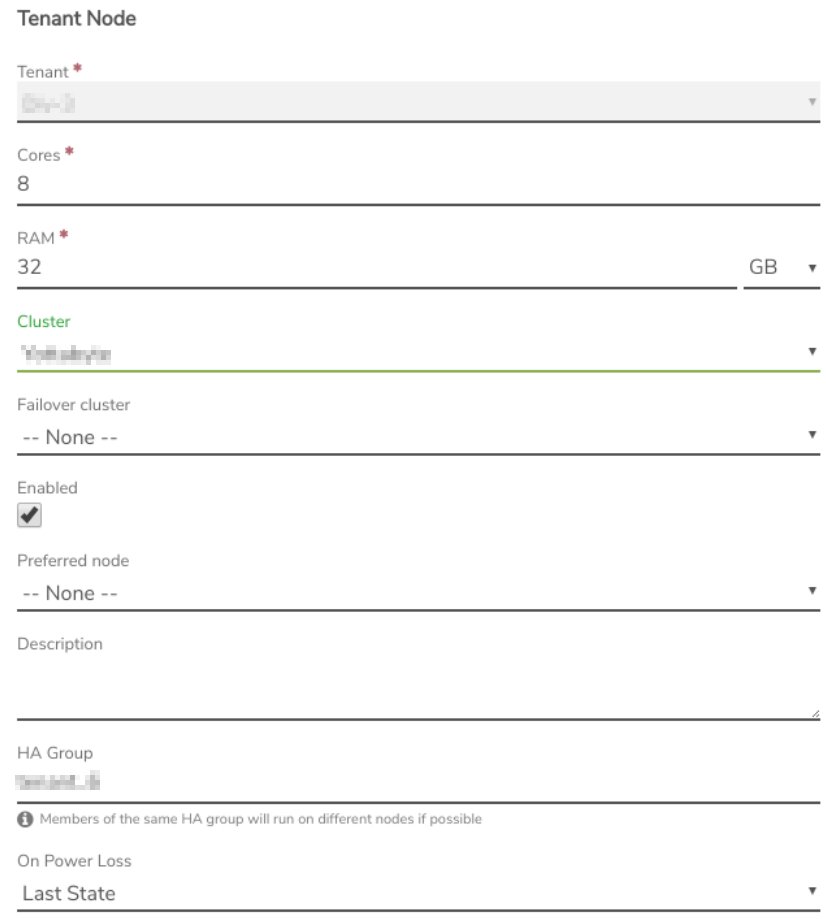
- Modify the Cores and / or RAM fields as desired.
- Click Submit. You are redirected to the Tenant Dashboard where the changes are reflected in the Tenant Nodes section. The increased resources are available immediately, no power cycle of the Node is required.

¶ To Add a Tenant Node:
Tenant Nodes can be added if needed for increasing resources. Multiple Nodes can also be put in place to accommodate a Tenant requirement for running VMs across multiple hosts, such as for clustering software (ex: Kubernetes, Stacki, etc.)
- From the Tenant Dashboard, Click Nodes on the left menu.
- Click New on the left menu.
- Select the number of Cores to provision to the Tenant Node.
- Select the amount of RAM to provision to the Tenant Node (can be specified in Gigabyte or Megabyte)
NOTE: The system will always allow the assignment of Cores/RAM to a Tenant Node regardless of how much RAM has already been provisioned; however, the resources must actually be available to power on the Tenant Node.
- Optionally, a Cluster can be selected on which to run the Tenant, or it can be left at --Default-- (specified by System > Settings > Default cluster for tenant nodes)
- Optionally, a Failover cluster can be selected on which to run the Tenant if the primary selected cluster is not available. This can be left at --Default -- (specified by System > Settings > Default cluster for tenant nodes)
- Optionally, a Preferred node can be selected to specify a “first-choice” host Node for running this Tenant. Typically it is not recommended to select a Preferred node for a Tenant Node. This is an advanced setting for Tenant Nodes; setting incorrectly can adversely affect built-in redundancy. Use this setting with care. Consult with Verge.io Support for additional assistance.
- Optionally, a Description can be entered to record further information for this Tenant Node.
- Select the desired On Power Loss setting:
- Last State - The Tenant will only be powered on if it was on at the time of power loss.
- Leave Off - The Tenant will not be powered on when the power is restored (regardless of its state at time of the power loss).
- Power On - The Tenant will be powered on when the power is restored (regardless of its state at time of the power loss).
- Click Submit.
¶ Storage
To Provision a new Tier of Storage to a Tenant:
These instructions are for adding Storage for a storage tier on which the Tenant does not already have provisioned storage. To increase the provisioned storage on a tier where the Tenant already has storage, see instructions below.
- Navigate to the Tenant Dashboard.
- Click Add Storage on the left menu.
- Select the desired Tier from the dropdown list.
- Enter the desired amount of storage in the Provisioned field and select the desired unit of measure (B, KB, MB, GB, TB)
- Click Submit to add the provisioned storage.
To Add more storage on a Tier that is already provisioned to the Tenant:
-
Navigate to the Tenant Dashboard.
-
Scroll down to the Storage section.
-
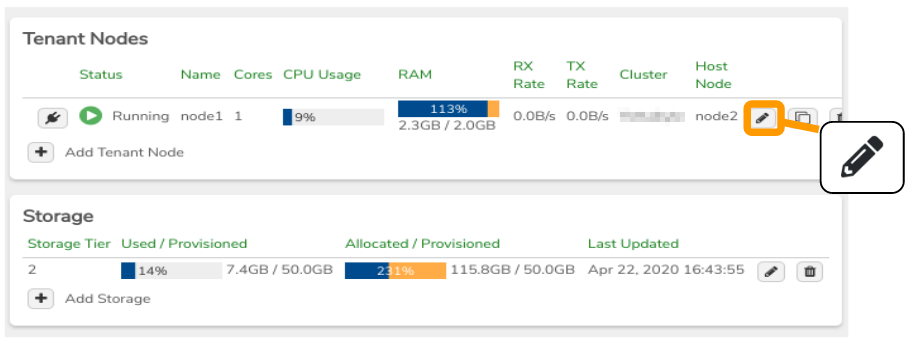
Click the Edit button (far right) for the desired storage tier.

-
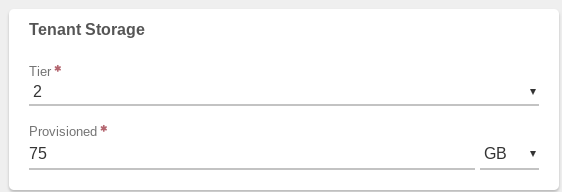
Change the Provisioned field to the total amount to be provisioned to the Tenant. (For example, if the current amount is 50 GB and you want to add 25 GB, enter the new desired total of 75 GB).

¶ Other Tenant Node Modifications
These fields can also be changed by Editing a Tenant Node.
- **Cluster **
NOTE: Change of Cluster would not be typical as different Clusters have different underlying physical hardware. If a Cluster change should be made, the Tenant Node would require a power cycle to apply the change. If changing to different physical hardware, it is important to consider changes that may be required for existing VMs running within the Tenant. Consult VergeIO Support for assistance.
- Failover cluster
See the above note about changing the cluster. - Preferred Node
NOTE: Preferred Node field is only utilized at the point of a Tenant being powered on. However, Tenant Nodes can be migrated manually from the VergeIO UI.
The following Tenant fields are covered as part of the Creating Tenants training.
- Description
- HA Group
- On Power Loss
¶ Reducing Tenant Resources
Tenant Compute resources can be reduced on-the-fly, by deleting a Tenant Node or reducing the cores/RAM assigned to Tenant Nodes.
¶ Reducing cores/RAM provisioned to a Tenant Node
The Tenant Node does not need to be powered off to reduce resource settings; however, if those resources are currently in use by Tenant workloads they will not be reclaimed until VMS are shut down.
- Example: If you reduce a Tenant Node RAM resource to 28GB while 32GB is in use by Tenant VMs, the change can be made, but it does not automatically shut down running VMS or reclaim the RAM.
¶ Deleting a Tenant Node
To delete a Tenant Node, it must first be powered off. Do not delete the original Tenant Node; each Tenant needs at least one node.
Need more Help? Email [email protected] or call us at (855) 855-8300