¶ Creating Tenants
This sub-module will cover creating a Tenant via:
- The Custom Tenant Wizard
- Cloning an existing Tenant.
- VergeIO includes the ability to clone existing Tenants.
TIP: You can watch the following informational video and consult with VergeIO Support for additional assistance.
- Tenants can also be created using Recipes. The Recipe Engine provides the ability to create customizable templates to streamline Tenant creation, especially in larger environments.
TIP: You can watch the following informational video and consult with VergeIO Support for additional assistance.
¶ Custom Tenant Wizard
The Custom Tenant Wizard is a series of dialog boxes to lead you through the creation of a new Tenant.
To create a New Tenant via the Custom Tenant Wizard:
- Click Tenants from the Main Dashboard (quick-link or left menu.
- Click New Tenant from the left menu.
- From the Catalog list (top left), select --Custom--.
- “Custom Tenant” will now display under the Selection area and will be the selected item.
- Click Next (bottom of the screen). The Tenant Settings form appears.
- Enter a Name for the Tenant.
- URL is simply a helper field to provide a link for you (as the Service Provider) within your own VergeIO UI, to access the Tenant VergeIO UI. This field can be left blank at this point as it will automatically be populated when the first External IP is assigned to the Tenant. The URL provides a link for you to access the Tenant UI directly from your UI at the host level.
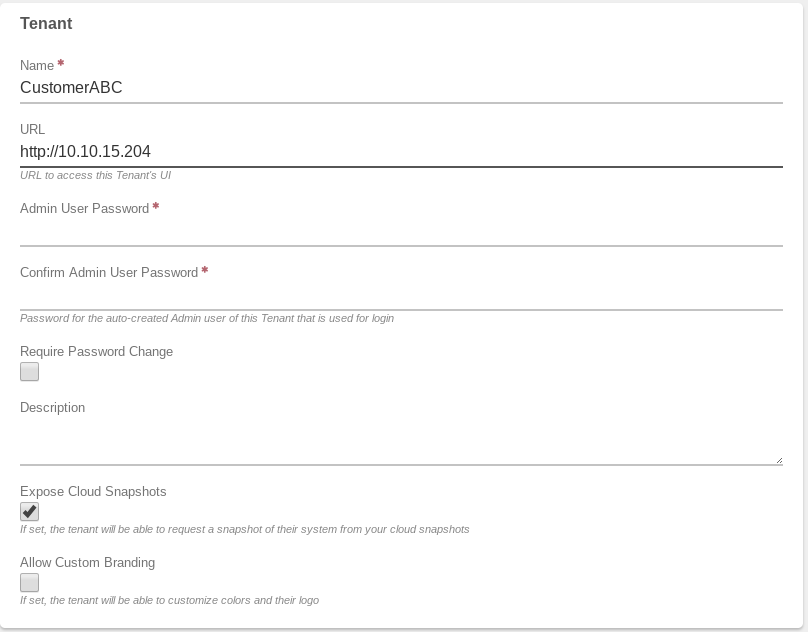
- Enter an Admin User Password and again in the Confirm Admin User Password field (required). This sets the password for the Tenant’s “admin” root user that will be auto-created.
- Optionally, Require Password Change (checkbox) can be selected to “force” a password change when the admin first logs into the Tenant.
- Optionally, a Description can record more information about this Tenant.
- By default, the Expose Cloud Snapshots option (checkbox) is selected. When selected, the Tenant can browse the Cloud Snapshots of the Parent and “self-serve” request their own Tenant Snapshot from those timestamps.
- Optionally, the Allow Custom Branding option (checkbox) can be selected to enable the Tenant to tailor their own VergeIO UI. The UI can be customized with different colors and logos. See Module 1.3 — User Interface Branding for further instructions.
- Click Submit (bottom of the page) to proceed.
The New Tenant Node form appears.
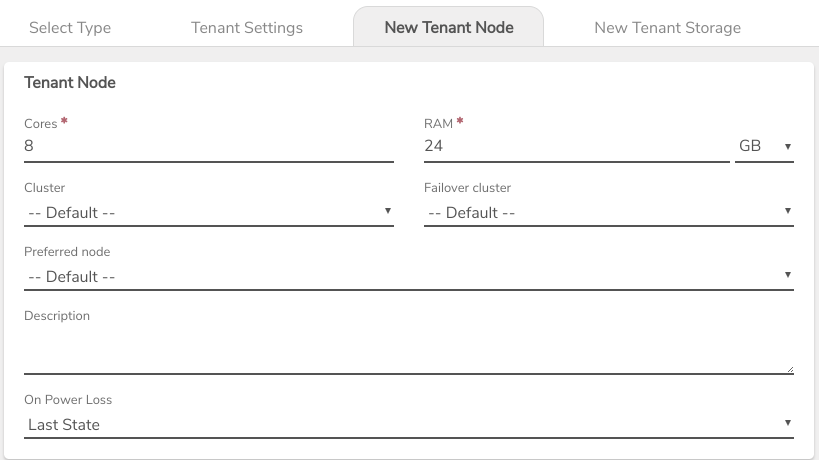
NOTE: The wizard will create one Tenant Node. The settings on this form will apply to that Tenant Node. Additional Tenant Nodes can be created upon completion of the wizard if needed.
- Select the number of Cores to provision to the Tenant Node.
- Select the amount of RAM to provision to the Tenant Node (can be specified in Gigabyte or Megabyte)
- Optionally, a Cluster can be selected on which to run the Tenant, or it can be left at --Default -- (specified by System > Settings > Default cluster for Tenant nodes)
- Optionally, a Failover cluster can be selected on which to run the Tenant if the primary selected cluster is not available. It can be left at --Default-- (specified by** System > Settings > Default cluster** for Tenant nodes)
- Optionally, a Preferred node can be selected to specify a “first-choice” host Node for running this Tenant. Typically, it is not recommended to select a Preferred node for a Tenant Node. This is an advanced setting for Tenant Nodes; setting incorrectly can adversely affect built-in redundancy. Use this setting with care. Consult with VergeIO Support for additional assistance.
- Optionally, a Description can be entered to record further information for this initial Tenant Node.
- Select desired On Power Loss setting:
- Last State - The Tenant will only be powered on if it was on at the time of power loss.
- Leave Off - The Tenant will not be powered on when power is restored (regardless of its state at the time of power loss).
- Power On - The Tenant will be powered on when power is restored (regardless of its state at the time of power loss).
- Click the Submit button (the bottom of page) to proceed.
The New Tenant Storage form appears.
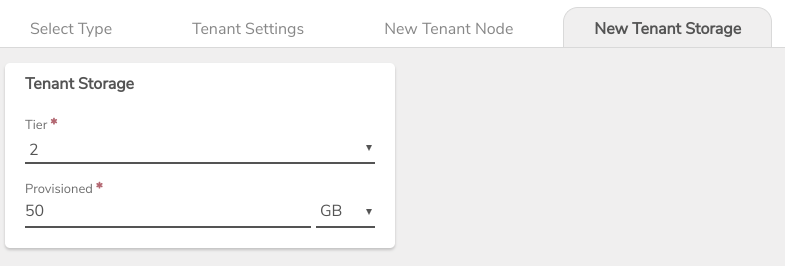
¶ Here you can optionally provision consumable storage to the Tenant. Storage can also be provisioned to the Tenant after completing the wizard. If you do not wish to define storage at this time, click Skip (bottom of page).
- Select a Storage Tier from the dropdown list.
- Enter an amount in Provisioned and select the desired unit of measure: Byte(B), Kilobyte(KB), Megabyte(MB), Gigabyte(GB), Terabyte(TB)
NOTE: Storage is thin provisioned.
- Click Submit (to provision defined storage) or Skip to proceed without provisioning storage.
The Network Settings form appears.
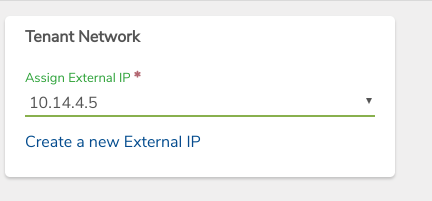
Here you can optionally assign one External IP to the Tenant. External IPs can be assigned to a Tenant after creation as well. By default, the first External IP assigned to the Tenant is configured to be the UI Address for the Tenant.
NOTE: Remember that an External IP is one that is simply external to the VergeIO system; it may or may not be a public Internet address; an External IP can be a private address on your external LAN/WAN (for example, 10.10.10.100)
- Select from the Assign External IP dropdown. (This list will include all Virtual IPs that have been defined in the Parent that are unassigned).
If the desired IP is not already configured as a Virtual IP in the parent system, click the Create a new External IP link to create the IP.
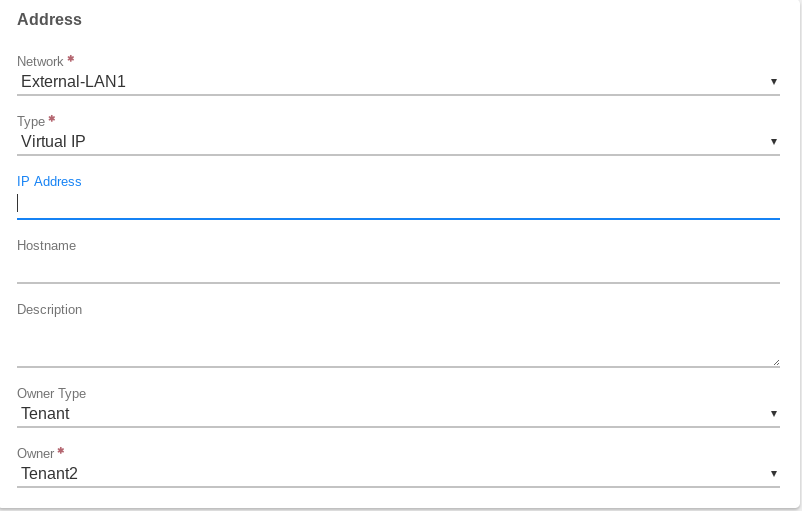
Create an External IP input form
- In the Type field, select Virtual IP.
- In the IP Address field, enter the Public(external) IP address.
- The Owner Type field (dropdown list) should display Tenant.
- The Owner field (dropdown list) should display the name of the new Tenant.
NOTE: To assign additional External IP Addresses to the Tenant, navigate to Networks >IP Addresses >New from the left menu.
Click Submit to finish the New Tenant Wizard. You should see a message saying the Tenant was created successfully and you are taken to the new Tenant Dashboard.
¶ Starting the New Tenant
Upon creating a Tenant, the UI will bring you to the new Tenant Dashboard page. From this Dashboard page, the Tenant can be powered on. (Power On on the left menu.)
¶ Creating a New Tenant from a Clone
Cloning a Tenant will duplicate the source Tenant. This can be very useful for testing, development, restoration, and other scenarios when you need a copy of a Tenant (for example, running the Tenant in a separate network for testing).
To Create a new Tenant from a Clone:
- Click Tenants from the Main Dashboard (quick-link or left menu.)
- Click New Tenant from the left menu.
- From the Catalog list (top left), select --Clone Existing--.
- A listing of all VMs will display under the Selection area and will be the selected item. Select the desired VM.
- Click Next (the bottom of page).
The Name input form appears.
Notice: This form will display the Tenant selected for clone along with resource specs of that existing Tenant.

- The Name will default to the Name of Tenant selected +”clone”, for example: when cloning a Tenant named “Tenant2”, the Name will default to “Tenant2 clone”. This name can be changed as desired.
- When the name is entered as intended, click Submit (the bottom of page).
- The Tenant is created and the new Tenant Dashboard appears.
Need more Help? Email [email protected] or call us at (855) 855-8300