¶ Creating Local Volumes
Creating a Local Volume produces a file system stored within the VergeIO vSAN. Local Volumes can be used to receive data from external systems for backups and imports using Volume syncs. Local Volumes can also be accessed directly by creating CIFS or NFS shares.
¶ To Create a New Local Volume:
- Navigate to the NAS Dashboard.
- Click Volumes on the left menu (or click the Volumes quick link).
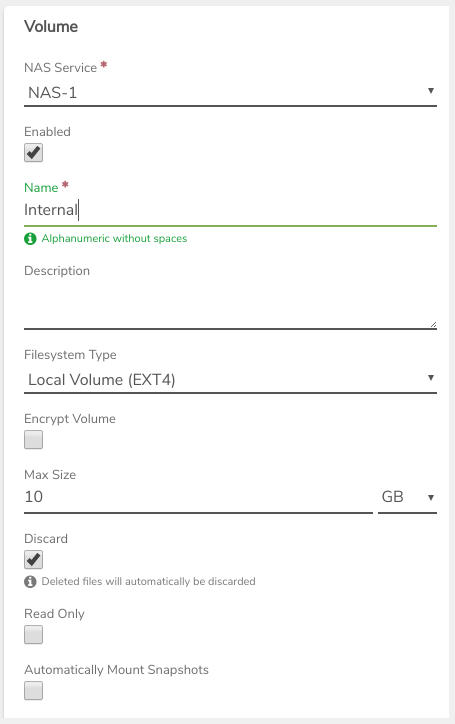
- Click New on the left menu. The New Volume page appears.
- Select the appropriate NAS Service. (Commonly, there is only one NAS Service; however, the system allows multiple NAS Services to be installed within the same VergeIO system.)
- Enter a Name for the Volume. Use a name that will be useful for future administration.
NOTE: The Volume's name must be unique to the selected NAS Service. (No other Volumes with the same name on the same NAS Service.)
- Optionally, enter a Description to store any additional information for organizational needs.
- Select Filesystem Type: Local Volume (EXT4).

- The Encrypt Volume feature can be enabled to encrypt the data within the Volume. Encryption considerations:
- Encryption selection can only be made when creating; Volume cannot be changed from encrypted to unencrypted or vice-versa after creation.
- Minor to moderate performance implications are involved with enabling Volume encryption.
- Select a Max Size for the Volume. Max size can be specified in TB, GB, MB, KB, or Byte units.
NOTE: When Max size is reached, the Volume will show out of space and continue to be read-able, but will not allow further writes. Resizing a Volume will require restarting the NAS VM before the changes take effect.
- The Discard option is checked by default. When discard is enabled: as items are deleted, space is freed and available for use on the underlying storage. When the option is disabled: the space is reclaimed inside the Volume as deletes happen and delete performance is increased; however, space is not reclaimed within the underlying storage.
- The Automatically Mount Snapshots option can be checked to make snapshots readily available for browsing/file restores. If this option is enabled: when a snapshot is taken, the snapshot is automatically mounted, read-only, within the ./snapshots folder of the Volume, providing immediate live access to snapshot data. Automatically mounting snapshots provide a high level of convenience, mainly when there is a frequent need for restores. This feature involves some increased NAS overhead that should be considered.
- Optionally, an Owner can be specified for the Volume to specify a User that owns the Volume. (Standard EXT4 permissions-owner assignment.)
- Optionally, a Group can be specified for the Volume to specify a Group that owns the Volume. (Standard EXT4 permissions-group assignment.)
- A Snapshot Profile can be selected to define the Volume Snapshot creation and cleanup schedule.
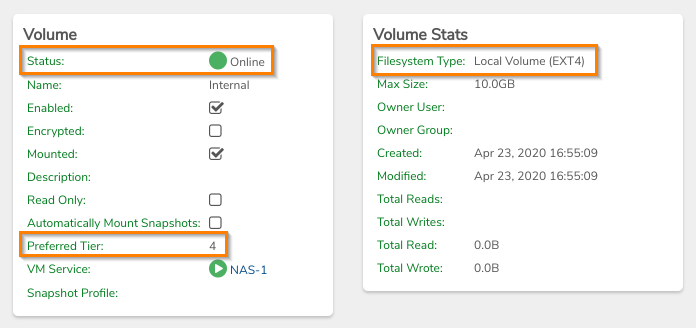
- Select Preferred Tier for storing this Volume. Preferred tier is the storage tier first attempted.
- Click Submit to create the new Volume with selected settings.
- The Volume dashboard displays. When the Volume shows the status Online, it is ready for use.
¶ If a Volume fails to come online:
- Verify the NAS Service is running/online as it must be online first before its Volumes can be brought online. The NAS Service is displayed on the Volume dashboard page along with its status (green circle indicates online).
- Check the Volume dashboard logs (bottom of the page)
- Check the NAS Service dashboard logs. You can navigate to the NAS Service dashboard page by clicking the VM Service link on the Volume dashboard page.

Need more Help? Email [email protected] or call us at (855) 855-8300