All of your Tenants are captured within your Cloud Snapshots. As the provider, you can restore a Tenant from one of your Cloud Snapshots; additionally, you can grant a Tenant the ability to access a Snapshot of their entire system from your Cloud Snapshots.
¶ To Restore a Tenant from a Cloud Snapshot:
WARNING: A Tenant Restore will overwrite everything within the existing Tenant.
- The Tenant must be Powered off before you can restore over it.
- From your Main Dashboard, select Tenants from the left menu.
- Double-click the desired Tenant from the list to bring up the Tenant dashboard.
- Click Snapshots on the left menu.
- Select the desired Snapshot within the list.
- Click Restore on the left menu.
- A Warning message will appear to caution that this will overwrite the entire existing Tenant.
- Click the Proceed button to continue/ Cancel to abort.
¶ To “Push” a Snapshot to a Tenant from your Cloud Snapshots.
- From the Main Dashboard, click Tenants.
- Click Tenants on the left menu.
- The Tenants listing will appear. Double-click the desired Tenant.
- Click Snapshots on the left menu. A listing of available Cloud Snapshots appears.
- Click to select the desired Cloud Snapshot.
- Click Convert on the left menu.

- The Name can be left as it is or changed as desired; a name change will only apply to the Tenant portion of the Snapshot that is being pushed down to the Tenant; this will not affect the name of Cloud Snapshot.

- Enter a Description (required).
- Click Submit.
NOTE:
What You See: a new Snapshot in the Tenant Snapshots list with Type=Tenant SnapshotWhat your Tenant Sees: a new Snapshot in their Cloud Snapshots list with Type=Local that is immediately available for the Tenant to use as they wish; the Tenant can extend its expiration, use it to restore their entire environment, or restore individual VMs. (Instructions for the Tenant are included at the end of this document.)
¶ To Allow a Tenant to pull their own Snapshots from your(the Provider’s) Cloud Snapshots:
- From the Main Dashboard, click Tenants.
- Click Tenants on the left menu.
- The Tenants listing will appear. Double-click the desired Tenant.
- Click Edit on the left menu.
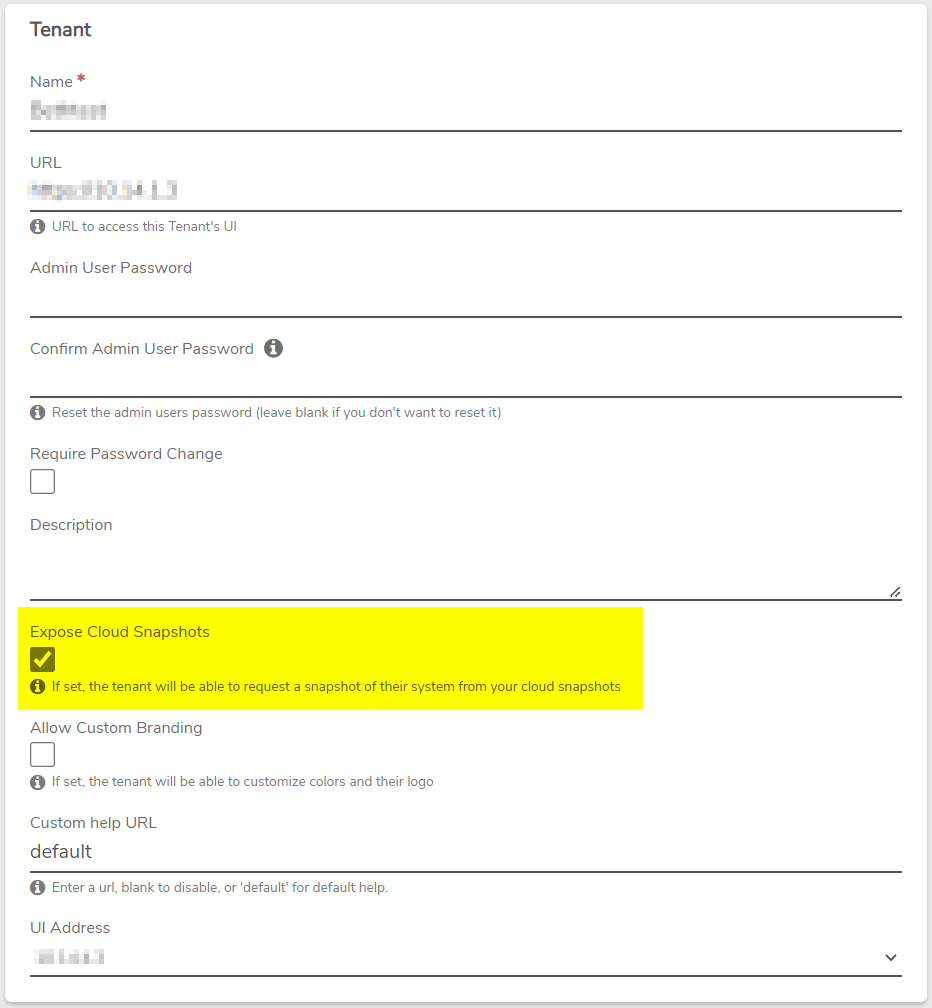
- Enable the Expose Cloud Snapshots (check box) option.

- Click Submit.
¶ Instructions for the Tenant
¶ Instructions for your Tenant to Access from your (Provider’s) Snapshots
Once you have given the Tenant access (by enabling the Expose Cloud Snapshots option (see above), these are the steps the Tenant will take to view a listing of Snapshots available and download their own Cloud Snapshots to use for restores.
(Tenant is logged into their own VergeIO UI):
- From the Main Dashboard, click System on the left menu.
- Click Cloud Snapshots on the left menu.
- Select the desired Provider Snapshot from the list of available timestamps.
- Snapshots from the Service Provider will have a type = “Provider”.
- Snapshots taken by the Tenant or already downloaded from the Provider will show a type = “Local”.
- Notice the Created Date/Time column to aid in selecting the correct snapshot.**
- Click **Request From Provider on the left menu. (Provider Snapshots need to be requested before they can be utilized.)
- When the requested Snapshot is available, the Type will change to Type = Local.
¶ Instructions for your Tenant to Restore their Entire System from your (Provider’s) Snapshot
- Tenant must first request the desired Snapshot from the Provider or the Provider must convert a Cloud Snapshot to push to the Tenant (Instructions above). A Snapshot that has been requested from Provider will now appear as type “Local” and will have a green dot.
- Select the Snapshot.
- Click Restore on the left menu.
- A Warning message will appear to caution that this will overwrite the entire (Tenant) Cloud.
- By default, the option is selected to take a snapshot of the entire cloud before this restore. This allows for later reverting the cloud to the state right before the restore operation if necessary.
- By default, the option to Reboot all nodes after the restore is enabled. This will let the system handle the node reboots.
WARNING: A reboot is necessary to apply the restore.
- Click the Proceed button to continue/ or Cancel to abort.
- Another confirmation message will appear; to continue with the Cloud Restore, click the Proceed button or simply leave it alone as the restore operation will continue in 60 seconds unless canceled.
- To Cancel the operation, the Cancel button must be clicked within 60 seconds; otherwise, the restore operation will automatically continue.
¶ Instructions for your Tenant to Restore individual VMs from your (Provider’s) Snapshot
- The Tenant must follow the above instructions first to request the desired Snapshot from the Provider. A Snapshot that has been requested from Provider will now appear as type = Local.
- Select the Snapshot.
- Click View VMs on the left menu.
- A listing of the individual VMs included in the Snapshot appears. Select a VM to restore.
- Click Recover on the left menu.
The VM Name will default to the original name. Change the name to restore to a new VM instance. - Click Submit.
The UI will automatically redirect you to the VM’s Dashboard page, where Power-on / Clone / Edit / Etc. operations can be performed as desired.
¶ Tenant Self-Maintained Snapshots
Tenants can create and maintain their own Snapshot Profiles and Snapshots as well; a Tenant would do this logged into their own VergeIO UI and follow the same instructions the Provider would follow for Cloud Snapshots.
Need more Help? Email [email protected] or call us at (855) 855-8300