¶ Rules
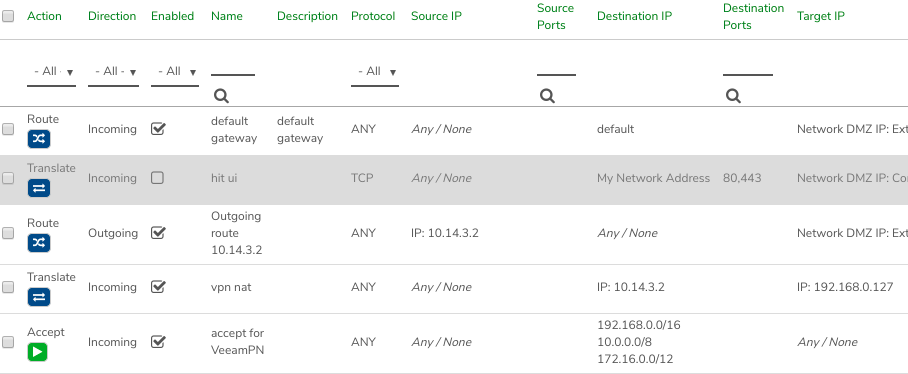
Rules are used to manage the flow of Layer 3 traffic in your VergeIO system. They allow you to perform traditional firewall tasks such as opening / blocking ports and network and address translations (NAT / PAT). Rules are also used to specify static routes that would traditionally be defined on network switches. Throttle settings within Rules allow for limiting specific types of traffic.
¶ Rule Types:
- Firewall (Accept / Drop / Reject)
- NAT / PAT (Translate)
- Route
¶ To View a Network’s Rules:
- Navigate to the specific Network Dashboard.
- Click Rules from the Left menu or the Rules quick-link.
For large Rule sets it may be helpful to filter the list (display Incoming only; Reject rules only, etc. -or- search on specific criteria such as Name, assigned IP, etc.)


¶ Creating Rules
NOTE: The following is basic instruction for creating a Network Rule and intended to provide initial familiarity. More detailed information for creating particular types of Rules is covered in subsequent modules.
¶ To Create a New Rule (from scratch):
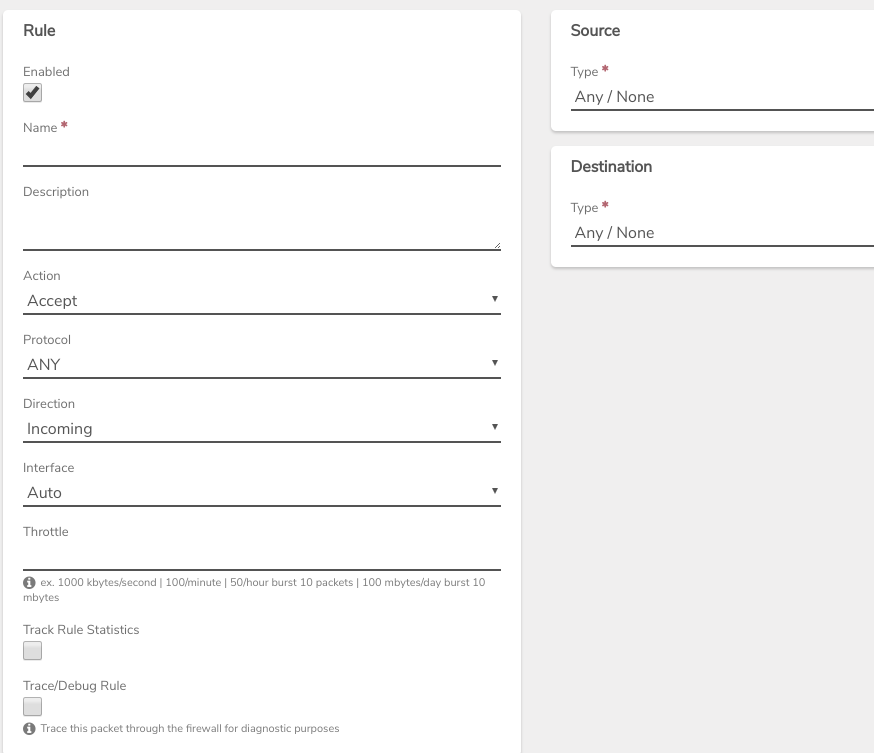
- From the Network Dashboard, Navigate to Rules > New.
- Enter a Name for the new Rule. (Name should be something helpful for future administration.)
- Action (Dropdown list)
- Accept - Allow packets through that meet the defined criteria
- Drop - Do not allow packets that meet the defined criteria
- Reject - Do not allow specified traffic and send ICMP destination unreachable back to the source, when permitted
- Translate - (NAT / PAT) - Map address / port outside of this network with address / port within this network
- Route - Define a routing Rule
- Protocol (Dropdown list)
A particular protocol can be selected from the dropdown list or the ANY option is available to apply this Rule to all protocols. - Direction (Dropdown list)
Incoming or Outgoing - Track Rule Statistics (Checkbox)
This option can be selected to amass totals of the traffic that process through this Rule. See the Tracking Stats document for more information. - Source - Where traffic comes from
- Destination - Where traffic is addressed to go
- Target - Where to actually direct traffic (This only applies to Translate and Route)
NOTE: Source / Destination / Target fields allow for selecting many system generated values from a dropdown list; custom entry of specific addresses as well. Consult the VergeIO In-line Help for listing and description of the pre-defined values available for Source / Destination / Target fields.
¶ To Clone a Rule (Create a New Rules Based on an Existing Rule):
- From the Network Dashboard, select Rules.
- All Existing Rules for the network are listed.
- Select the Rule (to be copied) from the list and click the copy icon
 on the far right of the selected line.
 - The new Rule Name will default to the name of the source Rule with "(copy)" appended to the end. Change the name to something helpful for future administration.
- Fields are pre-populated with the values of the original Rule, and can be altered as needed for the new Rule.
- When fields are changed as needed, click Submit.
- Click Apply Rules on the left menu to put the new Rule into effect. NOTE: Rules will need to be applied before taking effect. You may want to configure all your rules before applying.
¶ Default Rules
Some rules are created by default by the VergeIO System. These rules are auto-created when certain events take place:
- Upon VergeIO system installation / tenant creation to provide UI access
- When a new Tenant is created
- When a default route is specified
- When an External IP is assigned to an Internal network.
¶ Order of Rules
There are situations in which the sequence that Rules are processed can change behavior (example: a NAT / PAT rule to translate incoming traffic to a different port, while another rule that blocks traffic based on port; there could be different results depending upon which rule is run before the other.) Therefore, it may be important to consider the order of your Network Rules.
Keep in mind that rules are processed from the top of the list to the bottom.
¶ To Change the Order of Rules:
- Select the Rule(s) that you would like to move up the list.
- Make sure the desired Rules are checked on the left.
- Determine the Rule that you want to move.
- Move the selected Rules above and click the move icon

The selected Rules are moved up the list. - Continue this process until all Rules are in the desired sequence.

After selecting the Rules to be moved up, click the arrow button to move the selected rules above this point. - Click Apply Rules on the left menu to put the change(s) into effect.
Need more Help? Email [email protected] or call us at (855) 855-8300