¶ Creating a Remote NAS Volume
A Remote Volume is used to mount an external file system to the NAS (via CIFS or NFS). A Remote Volume can be used to synchronize data into the VergeIO system (for one-time import or recurring backups). It also can take advantage of VergeIO NAS features (such as Snapshots, antivirus, and remote syncs to offsite systems) on external file systems.
¶ To Create a New Remote Volume:
- Navigate to the NAS Dashboard.
- Click Volumes on the left menu (or click the Volumes quick link).
- Click New on the left menu. The New Volume page appears.
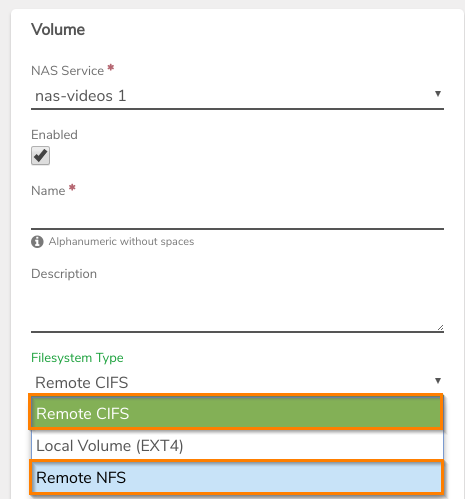
- Select the appropriate NAS Service. (Commonly, there is only one NAS Service; however, the system allows multiple NAS Services to be installed within the same VergeIO system.)
- Enter a Name for the Remote Volume. Use a name that will be useful for future administration.
NOTE: The Volume's name must be unique to the selected NAS Service. (No other Volumes with the same name on the same NAS Service.)
- Optionally, enter a Description to store any additional information for organizational needs.
- Select Filesystem Type: Remote CIFS -OR- Remote NFS, depending on the protocol to access the remote file system.

¶ Field entries will vary depending on the protocol used.
- Remote CIFS
- Remote Mount Target: Enter the UNC path to access the CIFS share. (Examples: //10.10.2.5/corp-share or //file01/HR)
- Username and Password: Enter username and password, if needed, to access the share.
- SMB Protocol Version: Leaving the default selection is recommended as the system will auto-detect the newest compatible version and work in most situations.
- Mount Options: This is provided for optional CIFS parameters to be used for advanced use. More information is available at: https://linux.die.net/man/8/mount
Consult with VergeIO Support for assistance in configuring advanced options. - Read-only: Select this option if the file system should be mounted as read-only within this Volume.
NOTE: Read-only access may already be determined by the user permissions defined on the source CIFS share.
- Remote NFS
- Remote Mount Target: Enter the full NFS path to access the NFS share; syntax: SERVER:/FullPathtoShare (Example1: server01:/export/svrdata or server01/data/testdata/Jan)
- Username and Password: Enter username and password if needed to access the share.
- NFS Protocol Version: Leaving the default selection is recommended as the system will auto-detect the newest compatible version and work in most situations.
- Mount Options: This allows for advanced-use, optional NFS mount parameters. More information is available at: https://linux.die.net/man/8/mount
Consult with VergeIO Support for assistance in configuring advanced options. - Read-only: Select this option if the file system should be mounted as read-only within this Volume.
NOTE: The export on the source side may already define the share as read-only.
When settings are completed, click Submit to create the Remote Volume.
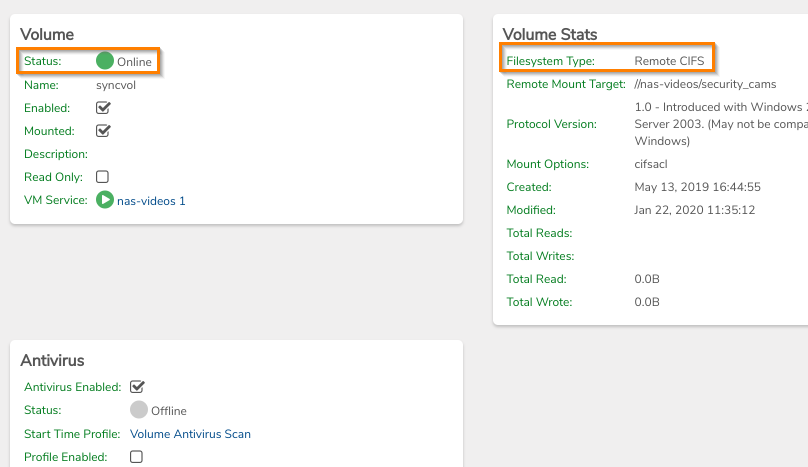
The Volume status will show as "Online" when mounted and ready for use.

¶ If a Volume fails to Come Online:
- Verify the NAS Service is running/online as it must be online before its Volumes can be brought online. The VM Service field shows the NAS Service's name and its status.
- Verify networking. The NAS service must be able to reach the external NFS or CIFS share.
- The Diagnostics engine can be used from the NAS service dashboard page to verify essential network accessibility. Navigate to the NAS service dashboard and click Diagnostics on the left menu. Using queries like ping, tracert, IP, etc., can provide troubleshooting info.
- CIFS uses port 445. Ensure that the port is open between your NAS Service and the remote CIFS/SMB share.
- Check the Volume dashboard logs (bottom of the page)
- Check the NAS Service dashboard logs. You can navigate to the NAS Service dashboard page by clicking the VM Service link on the Volume dashboard page.
Need more Help? Email [email protected] or call us at (855) 855-8300