¶ NAT / PAT Public IP Address / Port to Multiple Private Internal
¶ Scenario:
There are Web and application servers running on multiple VMs within a VergeIO Internal network. There is a single public IP address to be used for Internet / External access to these services.
¶ Solution:
We will need Route Rules and NAT / PAT Rules in place in order to direct traffic coming in on the Public IP to the correct internal server VMs with 192.x.x.x addresses.
The steps we need to complete for our solution:
- Define static (private) IPs for the destination VMs (web server, VDI, etc).
- Assign the public IP.
- Create a translation rule to send port 80 and 443 to the web server and send port 21 to the ftp server.
- Apply New Rules to both the External and Internal Networks.
¶ Define a static IP (for each destination VM: the webserver and the FTP server):
- From the Internal Network’s Dashboard, click IP Addresses on the left menu.
- If the VM has received a dynamic DHCP address, it will appear in the IP Addresses listing as type “Dynamic”:
- Double click the entry and change the Type to Static.
- Click Submit to save the change.
-OR-, If the VM has not received a dynamic DHCP address (The network is not running Dynamic DHCP or the DHCP server is not booted yet) a new Static IP Address entry can be created:
3. Obtain MAC address for the server (within the Guest OS.)
4. Click New from the left menu.
5. In the Type field, select Static.
6. In the IP Address field enter the private IP address.
7. Enter the MAC Address for the server.
8. Enter the Hostname of the serve
9. Optionally, a Description can be entered to record additional administrative information.
10. Click Submit.
You are returned to the IP Addresses listing page where the Static entry will appear in the IP Addresses listing.

¶ Assign the Public IP:
- From the External Network’s Dashboard, click IP Addresses on the left menu.
- Click New.
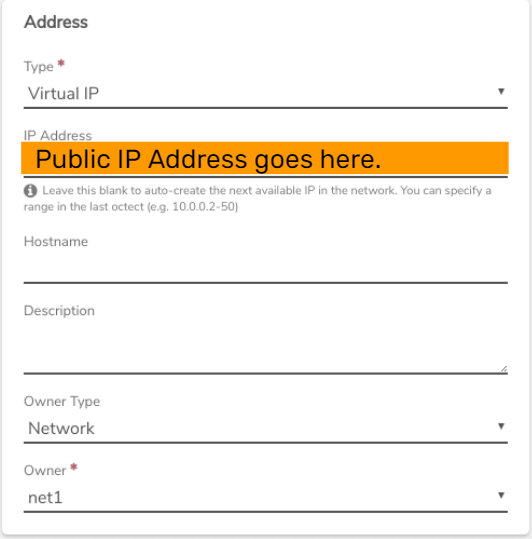
- In the Type field, select Virtual IP
- In the IP Address field, enter the public IP Address.
- Enter the Hostname.
- Optionally, Description can be entered to record additional administrative information.
- In the Owner Type dropdown list, select Network.
- In the Owner dropdown list, select the name of the private network.
- Click Submit.

- The new Virtual IP will now appear in the IP Addresses listing for the External Network.

NOTE: The System will auto-create necessary route Rules for you when you create the Virtual IP and assign it to your private network (an incoming Route Rule on the External Network, an outgoing Route Rule on the Internal Network). We will Apply Rules to both Networks when we are finished with all of our configuration.
¶ Create 2 Translate Rules: one for each port/private IP:
- From the Internal Network’s Dashboard, Click Rules on the left menu.
- Click New on the left menu.
- Enter a Name that will be helpful to future administration.
- Optionally, a Description can be entered to record additional administration information.
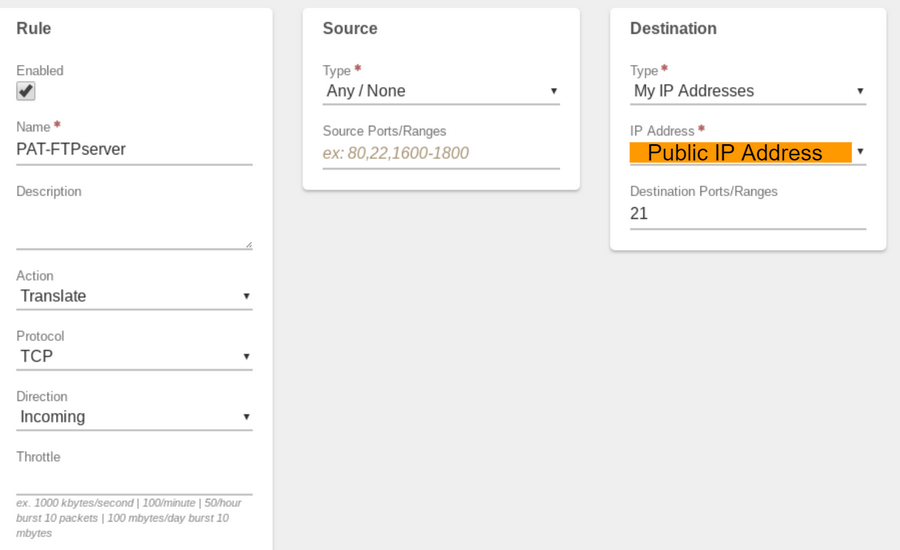
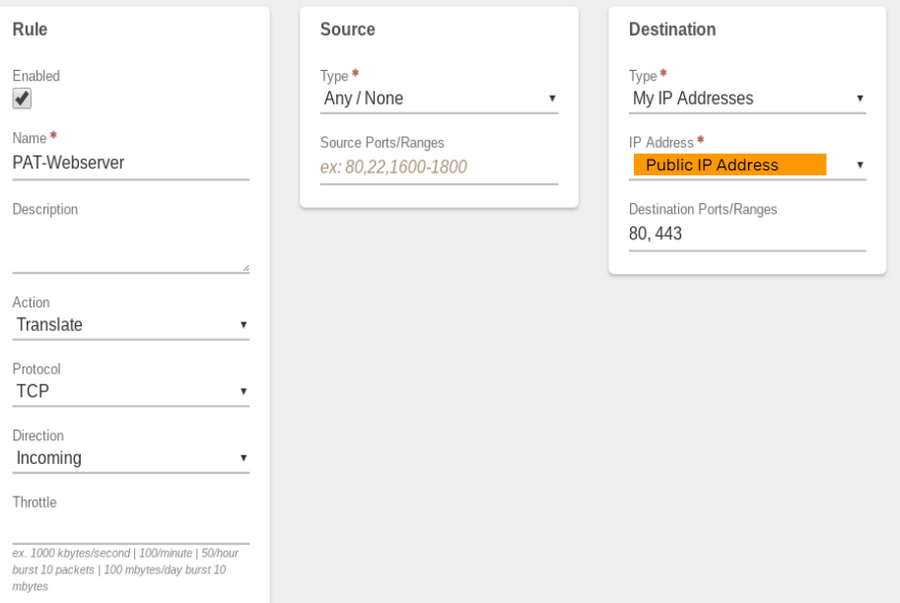
- In the Action dropdown, select Translate.
- In the Protocol dropdown, select TCP
- In the Direction dropdown, select Incoming.
Source:
- In the Type dropdown, select Any/None.
Destination:
- In the Type dropdown, select My IP Addresses.
- In the IP Address dropdown, select the public IP address.
- In the Destination Ports/Ranges enter the proper port(s)
- When creating the Rule for our Web Server we enter 80, 443
- When creating the Rule or our FTP server, we enter 21
Target:
- In the Type dropdown, select My IP Addresses.
- In the IP Address dropdown, select the private IP address.
- Click Submit.
- Click Apply Rules on the left menu.


¶ Apply Rules:
Now that all the Rules are created that we need, we can put them into effect.
- From the External Network Dashboard, Click Apply Rules on the left menu.
- From the Internal Network Dashboard, Click Apply Rules on the left menu.
Need more Help? Email [email protected] or call us at (855) 855-8300